Tuesday, October 23, 2012

Climbing Mount Tonodake - Part 3

This is the last installment of a climb to Mt. Tonodake, in the Tanzawa mountains. Part 1 is HERE. Part 2 is HERE

After reaching the summit of 新大日(shin-dai-nichi), it was time to make the final push to our goal -- 塔ノ岳山(to-no-dake-yama). Chains and wooden bridges were frequently seen as the trail became narrower.

The trail:

After about an hour of climbing, my friend and I reached the summit at 11.45 AM -- 4.5 hours after our departure! Hurray! I posed at the summit marker.

On top of the world!
The summit marker notes the elevation here is 1,491 meters above sea level, or 4,891 feet.
We stayed for about 30 minutes at the summit, eating lunch and shivering in the cold with other hikers. The summit was very cold, and mist covered the mountain top, so we were unable to catch a view of Mount Fuji from this point. On a clear day, hikers can enjoy Japan's iconic mountain from the summit of 塔ノ岳(to-no-dake)....Click HERE to view. (photo courtesy of wikipedia commons)

Eating lunch and shivering....(>_<):
We left the summit at 12.20 PM. While ascending, we had stopped at each peak to rest; for the descent, we stopped only once, at 三ノ塔(san-no-tou). The hike down was slow and steady, with some nice views....

Descending:

My climbing partner and I reached the car park at 4.30 PM -- approximately 9 hours after our departure.   The total distance was 14.5 kilometers, or 23,039 steps (I had carried a pedometer with me). Whew!

We have already planned our next climb, which will take place next month. We'll try a new route to  大山(oo-yama), traversing 2.3K to the summit. I'll be sure to blog about that experience. ^_^

塔ノ岳 (to-no-dake) is located in the Tanzawa Mountain range, in central Kanagawa. Access: Odakyu train line to Hadano station, then take the Kanachu bus to ヤビツ山道(yabitsu-yama-michi). The climb from Yabitsu to the summit will take 4-5 hours one way. 

You will need: good hiking boots, 1 liter of water, and food. We also carried an emergency kit, compass, map, flashlight and cell phone in case of injury/ poor weather. The trail is well marked and there are emergency numbers you can call in case of an accident along the trail. The trail is moderately difficult, with chains and ladders on the route, and very steep (60% grade) climbs in some areas. Toilets are VERY infrequent on this route -- we saw only 2 toilets open --- one at 三ノ塔 (san-no-tou) and the other at the summit. 

Further information can be found HERE. (site in Japanese only) 

Monday, October 22, 2012

Climbing Mount Tonodake - Part 2

Part 2 continues the climb from 三ノ塔(san-no-tou) to the third peak, 新大日(shin-dai-nichi) mountain. 

After leaving the summit of 三ノ塔(san-no-tou), the climb coursed along the mountain ridge. In the distance, we could see hikers making their way down, then back up to the second mountain peak.

Mountain hut in the distance and hikers mid-frame:


As mentioned yesterday, this section of the climb became much harder, as we encountered ladders and chains along the route.

cutenekko finishes climbing down a ladder:


A rock wall, with climbers descending using chains:


Soon after, we made it to our second peak, whose kanji I cannot read nor recall at this time. (I'll update the post tomorrow with the kanji/ English). My finger points to the location on the map. By this point, we had traveled about 4 kilometers.

Our route, marked in red from 三ノ塔(san-no-tou), to our current location:


A route marker, noting 2.3 kilometers to go:

From this point, we climbed further, to finally reach the peak of 新大日(shin-dai-nichi), which has an elevation of 1,340 meters (=4,396 feet). I was tired by this point, so we took photos, rested for about 10 minutes, then continued on, as the last segment would be the longest -- climbing from 新大日(shin-dai-nichi) to the summit, 塔ノ岳(tou-no-dake).

The summit of 新大日(shin-dai-nichi):

Route marker from 新大日(shin-dai-nichi) to our goal:

I'll post photos from the last part of our climb tomorrow. I hope you'll visit again! ^_^


Sunday, October 21, 2012

Climbing Mount Tonodake - Part 1

This past Saturday, a friend and I decided to go mountain climbing for the day. We selected a route in the Tanzawa Mountain range, in mid-Kanagawa. The route traveled 7.5 km one way, over four other mountain peaks, before reaching the summit of Mount Tonodake (1,491 meters).

Route map and facts
Distance: 7.5 km (one way)
Total height: 1,491 meters (4,891 feet)
Time: 4 hours (one way)

Cutenekko: ready for climbing! ^_^


We started from Bodai Pass at 07:15. There are two routes, but we recommend the forest route, which passes 二ノ塔(ni-no-to), as the view and path are more spectacular.

Route option #1:
Go through this gate, following the road for about 500 meters. On your left, you'll see a wooden route marker to 二ノ塔(ni-no-tou). This route is not recommended, as it's full of rocks and stairs, but most people hike this route:


Route option #2 (recommended):
On the left of the gate seen above, you can find this trail. From here, hikers climb to 三ノ塔(san-no-tou):


This route is not as well known, so we enjoyed climbing through the forest completely alone....

Trail:


Forest: 


View through the trees:


After 20 minutes of climbing, we reached a small shrine in the forest and a route marker:
To the right: a small shrine. To the left, the trail continues to san-no-tou.
After another 15 minutes or so, we reached a viewpoint. Great! 

Cutenekko points out the view:
Finally, after about 1 hour, we reached the summit of 三ノ塔(san-no-tou). This peak is 1,205 meters (or 3,953 feet). Hurray! 

The summit point for the first of 4 mountains:

From 三ノ塔(san-no-tou) to the next two mountains, was really tough. I'll share photos from that experience in another post. 

Tanazawa mountain range is located in central Kanagawa. Access: Odakyu train to Hadano sta. Kanachu bus to Yabitsu Pass. Cost: ¥460 for the bus. It takes 38 minutes. 

This climb is ranked "quite tough", especially if you want to do it in one day. The trail is very steep, and climbers need to use ladders and chains in some areas. Hiking boots, rainwear, and a pack with 1 litre of water + food are a must. Allow 8-9 hours for the complete climb (ascent + descent). 

For beginners, we recommend this trail to the summit of 三ノ塔(san-no-tou) only. It's only steep in one area (you'll need to use a rope to pull yourself up the slope); the rest of the trail is very nice and quite relaxing. 

General information regarding Tanzawa Mountains is HERE.
A blog about a similar climb (with reader's comments on additional routes) can be found HERE

Thursday, October 18, 2012

Belly Dance Performance

The school where I take my flute lessons each week had an advertisement for an interesting show -- belly dancing. A friend of mine is a fan of this dance, so I mentioned it to her and we went together. The show was held in Yokohama.

Dancers with scarves:


Strike a pose:


It was interesting to see the dancers using different props -- scarves, canes and swords. Below,  a group of dancers used canes-- twirling, tapping,and even balancing them on their heads!

Cane dance:


Belly dancing is quite popular in Japan; it is promoted here as "body toning/ women's fitness". I really enjoy the music. As a lover of global sounds, there is something about Turkish and Arabic music that makes me want to move.

Video of dancers:

My friend and I both enjoyed this performance. The following week, I signed up for Belly Dancing lessons. My first lesson was yesterday and featured stretches, basic movements and a dance routine. It's a lot more difficult than it looks. Although I go to the gym 2~3 times a week, for 2 hours each time, the Belly Dance class made me sweat! You have to be quite flexible and able to isolate many parts of the body while keeping your head still. Balance is also a key point. The class reminded me of Pilates -- it featured many core fitness techniques.

Interested in learning Belly Dancing? There are a number of schools in Japan. See HERE for info. 

You Tube also has a number of videos where you can practice at home. See samples HERE

CNNGo Tokyo ran an article on Belly Dancing in Japan in 2010. See the article HERE

Wednesday, October 17, 2012

Park Hyatt Afternoon Tea

A friend of mine, who is a new mother, suggested getting together sometime to enjoy lunch together. I offered to take her to the Park Hyatt Hotel's "Peak Lounge", which from 2-5pm daily, offers a great tea service. The lounge is located on the 41st floor, so you can enjoy great views while munching!

The tea set:


Extra service desserts:


Her daughter had never been to an afternoon tea, and even though she was only 6 months, she really enjoyed the comfy chairs and view from the window. We had some visitors too....

Construction workers outside:


We stayed until dusk, and I took a photo of the view. Nice no?

Peak Lounge is located in the Park Hyatt Hotel (made famous by the movie "Lost in Translation"). The hotel is located in Shinjuku. You can walk underground from Shinjuku station to the hotel (about 8 minutes). Just follow the signs that say: "Tokyo Government Buildings". 
The Afternoon Tea service is from 14:00 ~ 17:00. ¥3,900 per person ($40). Tea service includes all you can drink teas, sweets and 3-tier dessert plate. Reservations recommended. Site HERE

Tuesday, October 16, 2012

Autumn Baseball Tournament

In early October, I was invited to spend a warm Saturday afternoon watching high school baseball. This tournament was for Kanagawa High School boys, first to second year students only.

I'm not a huge baseball fan, but I love being outdoors and watching sports is a favorite of most Canadians, so I agreed to go.

The tickets:


The baseball ground:


The park itself was located in a massive sports area in Southern Kanagawa, 10 minutes by train from Yokohama. While walking to the baseball stadium, we passed by: a running track, a soccer field, an art museum, water fountains, two swimming pools and tennis courts -- all located in this sports area. I thought Japan really invests in "quality of life" for its citizens.

In an earlier post on high school baseball, I mentioned how the opposing teams bow to each other before play begins. I finally caught a photo of this unique tradition:

The players line up....


....and bow. 

Unfortunately, the team I came to cheer, lost, but still, it was a good time.

Japanese baseball is almost finished up for the year. Next year, in spring, play begins again. These high school tournaments are a great deal -- only ¥500 ($5) per person. 

Thursday, October 11, 2012

Kikyouya Shingen Mochi Factory

My friend took a day off work and drove me to Yamanashi prefecture. The final destination was a secret, but when we arrived, the smell of something sweet hung in the air. Oh! We were going to visit a Japanese sweets factory. This factory is very famous, having been featured on a Japanese television show. It's known for mochi (sweet, pounded rice cakes) with brown sugar syrup.

Factory shop:


Inside, we were not allowed photos, and the tour itself is quite short -- only 15 minutes! My friend and I both commented that the guide didn't allow much time to stop and look at things or to ask questions....(>_<)

At the end of the tour, for ¥300, you could learn how to tie their specialty -- mini packets of mochi. During the tour, we watched lines of workers individually tying each sweet. The guide said they can tie one in 6 seconds! My friend decided to give it a try and I took photos...

Step 1: Lay the clear sheet on the table in a diamond shape.


Step 2: Place the packet of mochi on the sheet, folding the top and bottom ends of the sheet over the mochi.

Step 3: Use the left and right sides of the sheet to tie over the mochi. 


Finished! 


To tie 4 packets and place them in a decorative box, took about 5 minutes -- much slower than the factory workers! We were amazed at their speed.

As for the taste? It's really sweet...the kind of sweet that will make you go into "sugar shock". We gave our packets of mochi to friends as a souvenir.

Yamanashi prefecture is famous for shingen mochi, grapes and peaches. There are many "U-Pick" grape and peach fields. A drive through the prefecture is a must -- it's sprinkled with tall mountains and is cool in summer. Highly recommended. 

Access: Chuo expressway from Kanagawa, takes about 2.5 hours. 

The Kikyouya Shingen Mochi factory is located in Yamanashi prefecture. The factory tour is free and reservations are not required. Website info is HERE. (日本語) Their factory shop sells sweets at 50% off. A great deal!

Kirin Beer Factory

My readers know I am not a drinker or a connoisseur of alcohol, so why in the heck would I visit a beer factory? Well, two reasons: factory tours are hugely popular in Japan now, and they are free. I love free things, so when a friend invited to visit one, I didn't hesitate to go.

Kirin Beer is a major Japanese brewery with many factories in the country. This particular one is nicknamed "Beer Village" and is located in Yokohama area.

Map of the area:

The front sign of the factory:


Inside, we were led on a well organized tour, which included a film,  an explanation of the beer making process, the storage containers, etc. We were only allowed photos inside the factory in one location, so unfortunately I can't show my readers too much.

Beer vats:


This is a celebrity who appears in the ads for Kirin beer:

Near the end of the tour, everyone got excited in our group. Why? You get free beer for about 30 minutes!! ^_^ If you don't drink alcohol like me, you can select teas, lemon soda, etc. The guide will also explain the proper way to pour a can of beer. Here's how...

1) Hold the can about 50 cm above the glass. Pour.
2) When bubbles reach the top, stop. Wait for the head of the beer to subside.
3) When the head of the beer reaches 1/3 of the beer in the glass, pour more beer in the glass.
4) Wait for the head of the beer to reach 1/3 of the beer in the glass again. Pour in the remaining beer.

Due to adding oxygen, the beer supposedly tastes better. Give it a try and let me know. ^_^

After the tour, my friend and I explored around the grounds. We walked through a large garden...

Garden path:

I found a bench and pretended to be a drunk, passed out, business man.....
which you see a lot in Japan when taking late night trains!
all those beer fumes....
Near the end of the park is a large, German restaurant which serves beer and sausages. The place can be rented out for parties too. It looked really nice. We'll probably come back again. ^_^


Kirin Beer factory tour is by reservation only. Tours last only 30 minutes, with 30 - 40 minutes of drinking at the end. The tour is only in Japanese. Information and reservations can be made HERE. An English site which explains the basics is HERE

***Special Bonus***
Artist Adrian Storey photographed the phenomenon of business workers sleeping in the streets. This really does happen in Japan! You can see his photo collection HERE. (courtesy of CNN Go) 

Tuesday, October 9, 2012

Tokyo Disney Sea - Part 2

...shots from inside the mammoth park continue. Part one is HERE.

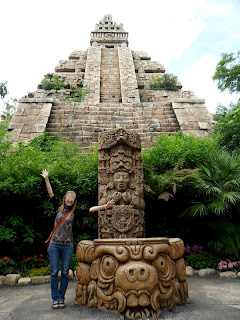
One of the most popular rides at this park is the "Indiana Jones and the Temple of the Crystal Skull" attraction. You should get a Fast Pass (an advance ticket) as the wait times are often 2+ hours. Before our scheduled entrance time, I took photos of the temple outside, in the area called "Lost River Delta".

I'm in Mexico! (not really....)

 My friend really wanted to visit "Ariel's Lagoon", based on the Little Mermaid. As the black clouds were rolling in, it was a safe haven from a possible rain shower. The Lagoon area is entirely indoors. Inside, we enjoyed some easy "kiddie rides" and the Little Mermaid show. ^_^
 After the clouds parted, we wandered over the Aladdin area, where I was surprised to see two sumo wrestlers, also enjoying the park. My friend coerced me into asking them for a photo. I looked excited, but they looked tired! (laugh)
 I advised my friend to get another Fast Pass for a popular attraction: Journey to the Center of the Earth. This ride is located in the "Mysterious Island" -- smack dab in the center of the park -- and reflects the film. The ride is quite thrilling, shooting riders out of the mountain at high speed. I liked this ride very much. ^_^

Mysterious Island:
the volcano in the background "erupts" nightly at 5PM
A tunnel in "Mysterious Island":
 My friend and I felt we enjoyed all the attractions we had hoped to ride, so we decided to spend the rest of the late afternoon wondering around the park to enjoy the views. This is Mediterranean Harbor, which looks like Italy, no? ^_^/
We caught the jazz extravaganza: Big Band Beat with Mickey Mouse on drums. I loved it, but when I looked over at my friend, he was sleeping!! (laugh) He said the chairs were just too comfortable. Haha.
You can enjoy a video of the show below....


We also explored the newest part of the park, "Toyville" which is based on the Toy Story films. I got a funny photo here...^_^
Whoa, piggy!!
 In the American Waterfront area, there is a huge model ship called the Columbus. You can "board" the shop and enjoy the views from the deck. We did this at sunset. Magnificent! ^_^/

Deck of the ship:


Sunset view: 

I really enjoyed my time at the park. This was my third visit, but I felt I had enjoyed this visit the most. After returning home, we visited a sushi restaurant. I'll show you that soon. ^_^

Tokyo Disney Sea is located in Chiba. To get there, take the Maihama train line to Tokyo Disney Resort station. Then, ride the monorail to Tokyo Disney Sea. The monorail is ¥250 per ride. Entrance tickets are over ¥6,000 for adults. You can get some discounts via travel agencies and train companies. The resort website is HERE